comments 18

Best Roast Chicken

Best Roast Chicken with Nigel Slater's root vegetable tangle

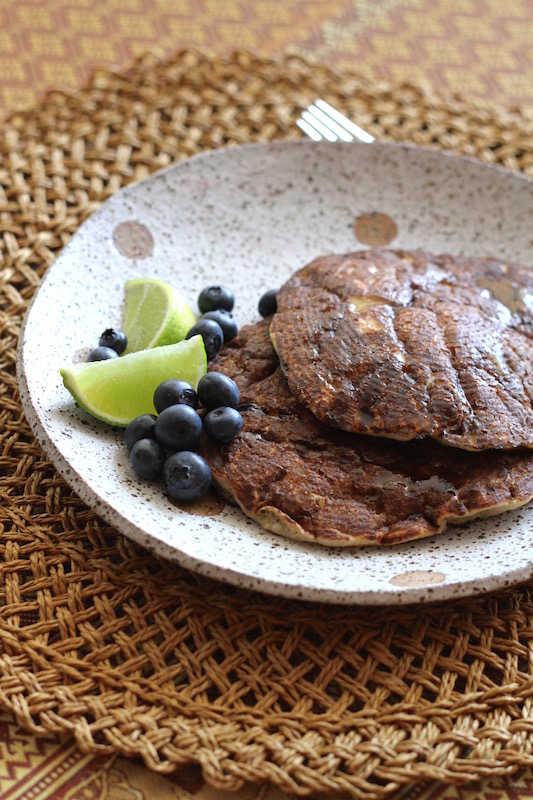
I‘ve had a string of failures in the kitchen lately, new recipes, all of them. There was the savoury tart with pastry so short that it collapsed into crumbs when cut, the new method for making ricotta that produced dry and rubbery curds, and the hazelnut and blueberry cake I baked for dinner with friends that seriously damaged my reputation in the cake department. Saddest of all, despite carefully planning a romantic dinner for a stay-at-home date night, all I managed to serve up was an over-cooked leg of lamb and soupy chocolate pudding (we still ate it, but it wasn’t exactly the culinary seduction I had imagined). Enough experimentation! After all this failure, I wanted a recipe that was tried and true. Enter: roast chicken.

Roast Chicken with Rosemary, Lemon and Garlic

I’m not assuming that any of you needs a recipe for roasting chicken. It’s just chicken, seasoning, a little fat, a hot oven and enough time to turn the juices from bloody to clear – that’s really the only bit you need to get right; beyond that, everyone tends to have their own method. For the longest time I roasted chickens in a moderate oven, basting with juices and wine every 20 minutes. It was a bit fussy and I had to hover in the kitchen, but I was perfectly happy going through life like this until the day I read about Molly Wizenberg’s preferred technique. Intrigued, I gave it a whirl, and the rest, as they say, is history.

Chicken, adorned with butter, salt, pepper and herbs, ready for resting overnight

There is no going back when you learn a new technique. My roast chicken had been perfectly edible, but in my quest for crispy skin I often produced dry meat, despite all that basting. When I followed Molly’s instructions, not only did I get a flavoursome, tender, juicy roast, but the chicken was also covered in golden, crispy skin. It was, and remains, roast chicken nirvana. (An equally enlightening moment was learning that mushrooms are best fried in a completely dry pan. Sauté them until their water is released and cooks off and only then add butter or liquid. Try it; it’s a revelation.)

Golden Roast Chicken

Looking back at Molly’s post now, I can see that I have settled into my own interpretation of some of the finer details, but the points on which I am unwavering are, first, the practice of seasoning the bird inside and out before letting it rest for 24-48 hours. Yes it does take forward planning, but it’s this gentle brining process that is responsible for the soft, succulent meat. Second, the chicken must be roasted at a very high temperature and flipped over twice during its time in the oven. This creates an even roast over the entire chicken and lets the juices run down into the naturally drier breast meat.

Roast Chicken with Nigel Slater's Root Vegetable Tangle

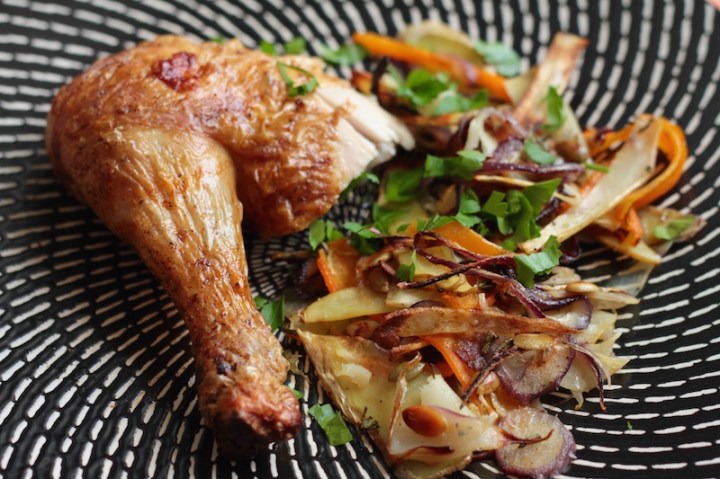
To go with this chicken I made Nigel Slater’s Root Vegetable Tangle (via Lucy at Nourish Me). I don’t like cluttering up the oven with another tray of roasting vegetables, taking heat and air flow away from the chicken. The advantage of Nigel’s Tangle, is that it can be prepared ahead and slipped into the oven the second that you take the chicken out. The finely shaved vegetables will cook and crisp in the time it takes you to rest and carve the chicken (and make gravy, if you are so inclined – I’m not). Cooking truly doesn’t get much better (or more reliable) than this.

(And because I just can’t stop myself from trying new recipes, I used the bones and carcass of the chicken to make bone broth for the first time, using this method. The broth was tasty (win!) but it made our house smell like a soup pot (not good). After two days of being enveloped in a funky haze of chicken-scent we gave up on the idea of “perpetual soup”. Reality is such a let-down sometimes.)

Best Roast Chicken

Adapted from Orangette

1 whole chicken, small-medium size
2 Tbsp butter
2 & 1/2 tsp fine salt
1 tsp ground black pepper
Zest of 1 small lemon
2 cloves garlic
2 Tbsp fresh rosemary leaves

Wash the chicken inside and out with cold water then dry thoroughly with paper towels. Place on a baking tray or in a roasting pan.

Remove the zest of the lemon and pound in a mortar and pestle along with the garlic and rosemary. Add half of the butter, 1 tsp of the salt and half the pepper to the herbs and mash together to combine. Spread this mixture inside the cavity, pressing into the bones to ensure the herbs stick to the cavity.

Mix the remaining butter, salt and pepper together and spread over the exterior of the chicken. Rub and massage the seasoning into the meat, then cover the chicken with plastic wrap and refrigerate for 24-48 hours.

Take the chicken out of the fridge one hour before you want to cook it. Heat the oven to 220°C / 430°F. Place the chicken in the oven, breast side up and roast for 20 minutes. Take the chicken out and, using two long forks, flip the chicken over. Place it back in the oven for 20 minutes, then take it out and flip it over again. Roast for a final 20 minutes. Remove from the oven and rest for 15-20 minutes before carving.

Filed under: Eat
comments 7

Under-the-Weather Tea

Under the Weather Tea - a medicinal infusion of fresh turmeric, ginger and barley

It’s been a nasty winter for bugs and many people in our social and work circles have been felled by sickness. Colin and I usually get off pretty lightly and it’s years since we have both been properly sick with the kind of flu that flattens you for days. Even so, I’ve been battling a recurrent cold for the past few weeks and I’ll be well and truly glad to see the end of it. Meanwhile, warm cups of spicy tea are helping to soothe my fatigue and relieve lingering sinus congestion.

As a young teenager I had a strong interest in the medicinal properties of herbs (it probably should have been make-up and boys, but no, it was herbal medicine). Mum and Dad gave me a book about herbs for my 13th birthday and then all of a sudden I was buying dried lemongrass and red clover from the local natural foods store, planting herbs in pots, and picking mint and lemon balm from the garden for tea.  All through my teenage years I devoured books on herbal medicine and nutrition, and seriously thought about training as a naturopath.

Making Under the Weather Tea - homemade flu remedy with fresh ginger, turmeric and barley

It was natural that I would use my knowledge to experiment on myself. When sick, I would dose myself with strong infusions of ginger, cinnamon and cloves, sweetened with honey and lemon juice. Back then I was a bit hard core (valuing health over taste buds) and I downed many a bitter and over-drawn brew. If that wasn’t enough, I frequently followed up these potions by swallowing raw garlic cloves and sweat-inducing quantities of cayenne pepper mixed with honey. I’m a bit more moderate these days but I still turn to garlic (in capsules!), vitamin C tablets, and medicinal infusions when I’m feeling under the weather.

A few months ago I spotted an unusual recipe for barley tea prepared with turmeric and ginger and I tucked it away for just such a time as this. Turmeric has been having a major moment lately, praised for its anti-inflammatory, anti-oxidant and anti-bacterial properties – it’s become a modern cure-all that is even said to ward off cancer and dementiaLast summer I made a turmeric cordial that was wonderfully rehydrating in the mornings when diluted with iced water. For summer this year, I have my eye on this version, which is diluted with coconut water and lime juice.

Under the Weather Tea - homemade remedy for colds and flu with turmeric, ginger and barley

The slightly astringent and earthy flavour of turmeric also works brilliantly in a hot tea. In Amy Chaplin’s recipe below, turmeric and ginger root are boiled with pearl barley for several hours before being sweetened with honey and citrus juices. In Chinese and Ayurvedic medicine, barley water is used to hydrate and cool the body. The barley adds a silky texture to the tea, and when it gets to the point where you’re thinking about scotch and soda rather than yet another throat lozenge, it sure is nice to have something a little luxurious (and…I’m not saying that I haven’t also self-medicated with scotch!). I’ve added black pepper to the recipe (which is said to increase the bioavailability of curcumin, the active ingredient in turmeric) and cinnamon for its mellow warmth. Mixed with a vitamin C hit from the fresh lemon and orange juice, there is nothing better than this drink when you’re feeling under the weather.

Under-the-Weather Tea

Adapted from Amy Chaplin

1/4 cup pearl barley
8 cups water
2 inch piece fresh turmeric, grated or chopped finely (or 1 teaspoon ground turmeric)
4 inch piece fresh ginger, grated or chopped finely
1 cinnamon stick
1/2 tsp black peppercorns
To serve: lemon and/or orange juice and honey (manuka, if possible) to taste

Rinse the barley well and place in a medium pot with the spices and water. Cover with a lid and bring to a boil (watch the pot carefully as the barley tends to create a froth that can boil over). Once the water has boiled, reduce the heat and with the lid slightly ajar, simmer for 4 hours. Remove from heat and cool before straining into a large jar or bottle. Store in the fridge. When ready to serve, reheat 1 cup of liquid per person, adding citrus juices and honey to taste.

Filed under: Eat
comments 21

Banana Buckwheat Pancakes + a few good reads

Banana Buckwheat Pancakes with lime and maple syrup 6

Bananas are always in my fruit bowl lately because these Banana Buckwheat Pancakes are my new favourite weekend breakfast. They’re made with buttermilk, which keeps them light, and the buckwheat provides a nutty backdrop to the gently sweet bananas. Topped with a drizzle of maple syrup and a squeeze of lime, these pancakes take me right back to our long ago holiday in Bali, eating buttery pancakes at Windy’s Warung…only these ones are much easier on the waistline. I’m not a big fan of sweet breakfasts but these pancakes have won me over. They are a great way to start your Sunday.

Weekends are also for catching up on my favourite food blogs. I follow lots of blogs that I regard as key recipe resources where a constant stream of reliable recipes keeps me coming back, but there are many others that I enjoy for the sheer pleasure of reading. Most food blogs follow a standard format of a recipe + photos + some sort of back story. It’s logical, and it works but it’s also nice to see blogs that try to offer something different. These quirky examples are a few of my current favourites:

A recent niche emerging in food blogging is the use of illustrations instead of photographs. Fidget and the Rowes is a blog about the “superdog” Fidget and his housemates. Amusing cartoons feature the trio getting up to all sorts of mischief – Fidget using the last of the cannelloni to curl his hair and Salmon getting nervous about another of Trota’s experiments. Equally endearing is The Cat’s Whisk, which chronicles the adventures of Clementine the Cat Baker as she bakes beer into cupcakes and hangs out with King Kong. Finally, We Ate Hipsters offers a refreshing take on food news, presenting informative restaurant reviews with gorgeous illustrations.

Banana Buckwheat Pancakes with lime and maple syrup 5

Another genre I enjoy is literary blogging, which takes culinary inspiration from well known books. The Little Library Cafe recreates fictional dishes like the Chocolate Cocktail from Ian McEwan’s Atonement, Crab & Avocado Salad from Sylvia Plath’s The Bell Jar, and Green Eggs & Ham from Dr Seuss. Another favourite is Stroking the Monster’s Back which explores “how food, drink and literary works intersect to form a complete and unique sensory experience”. Whether it is Flannery O’Connor and Chocolate Milkshake or W.B. Yeats with my own Orange & Pistachio Granola, this blog always intrigues in unexpected ways.

I also love reading food bloggers who have a unique personality and writing style. Dana from I’ve Got Cake makes me laugh almost every time I read a post. She’s a sassy one alright – her Valentine’s Day post has to be the best anti-Valentine writing that I’ve ever read (and I would love to be a guest at one of her Sunday Dinners). Nicole from The Foodgasm Guide is equally funny, offering up risqué reviews of the best buns in San Fransisco and sexy recipes guaranteed to please. And then there is Morestomach, a perennial favourite for Lan’s dreamy photographs and habit of writing her posts as poems. Try Savoury Sticky Rice for a delightful introduction.

Banana Buckwheat Pancakes with maple syrup, lime and berries

Finally, I have a soft spot for blogs that focus on the cultural history of food, working to preserve and cherish the food of past eras. Retro Ruth writes at The Mid Century Menu, remaking vintage dishes and cocktails with true commitment. Some of the results are pretty bad (7Up and tomato sauce cocktail anyone?) but for all your Spam Pie and Jellied Potato Salad needs, Ruth has got you covered. Another favourite is Long White Kid, a New Zealand blogger who presents thoroughly researched accounts of iconic New Zealand foods like Hokey Pokey ice cream, Surprise Peas, and the old-fashioned Sally Lunn Bun.

Now, next Sunday make yourself these pancakes then settle in for a good, long read. Have a great week everyone!

Banana Buckwheat Pancakes

Adapted from Simply Recipes

1 cup buckwheat flour
1/2 cup plain flour
3 Tbsp sugar
1/2 tsp salt
1 tsp baking soda
3 Tbsp butter, melted
2 large, ripe bananas
1 egg
1 1/2 cups buttermilk (or plain yoghurt thinned with milk)
To serve: maple syrup, lime wedges, berries

Whisk together the buckwheat flour and plain flour, sugar, salt and baking soda in a large bowl. Pour the melted butter over the dry ingredients and whisk together. Mash the two bananas in a medium bowl, leaving them slightly lumpy. Crack the egg into the bowl along with the buttermilk and whisk together with the mashed bananas.

Pour the wet ingredients over the dry and stir with a spoon or spatula. The batter will be quite thick, but add more buttermilk or a splash of milk if it seems too dry. Be careful not to overmix – a few lumps are ok.

Heat a frying pan over a medium heat. Swish the surface with a few drops of oil then wipe it off with a paper towel. Using a 1/4 cup measuring utensil, ladle the batter onto the hot pan and shake the pan to encourage the batter to spread out (it will be fairly thick). Cook the pancake for 2-3 minutes, until the surface is covered with bubbles and the edges look dry. Flip over and cook for another minute or so on the other side. Repeat with the remaining batter. Serve the pancakes with maple syrup, berries and a squeeze of lime.

Filed under: Eat
comments 16

Chocolate & Cardamom Muesli Bars

Chocolate and Cardamom Muesli Bars - morning tea snack 2

Slightly obsessed by these Chocolate & Cardamom Muesli Bars lately – enough to make them a total of eight times and counting. I’ve been searching for the Bar that ultimately satisfies, you see, and each time I’ve done something a little different. Almost every weekend for the past two months I’ve pulled nuts and chocolate out of the cupboard, tweaked the method, trialled different combinations of nuts and reviewed the pro’s and con’s of each result. I’m not usually the type to fuss and labour and fine-tune like this, but these muesli bars got under my skin and I just had to keep working on them. Happily, I think I’ve done it: these are damn fine muesli bars.

Chocolate and Cardamom Muesli Bars 2

The original recipe comes via Heidi from the delightful blog, Apples Under My Bed. Heidi is a dietician, so you can count on her for healthy recipes, but what makes Heidi’s blog so appealing to me is her clear enjoyment of living life to the fullest. Her food is wholesome but, refreshingly, nothing is off limits. She loves butter and pie and ice cream, and she even loves coffee so much that she infused it into honey and poured it over her porridge. She’s my kind of girl.

Grinding cashews and pistachios and combining with oat flour and pumpkin seeds

I first made Heidi’s muesli bars to take to a picnic brunch in the park. The combination of nuts, cardamom and chocolate produced such a complex, spicy flavour that the bars disappeared quickly. I loved them as well, but couldn’t shake the feeling that they were close but not completely perfect to my tastes. The next weekend I had another go, replacing some of the almonds with pistachios, grinding the oats more finely, dialling back the cardamom slightly and increasing the chocolate (everything in moderation, right!). These changes produced such an addictively toothsome snack that we almost ate the entire batch on our weekend away at the beach (um…so much for moderation).

Chocolate and Cardamom Muesli Bars - fresh from the oven

I could have stopped there, but I had been thinking about activated nuts for a while and decided to incorporate this process. “Activation” involves soaking nuts in water to break down the enzymes that prohibit nuts from sprouting but which also make them difficult to digest (Michelle provides a handy guide to activating nuts here). The theory is that soaking nuts before eating them is easier on your gut and it also makes the nutrients more absorbable. I thought it was worth a go, but once I started soaking the nuts, it changed the flavour and texture of the muesli bars. I had better luck once I started drying the nuts out prior to baking with them and I eventually settled on the best combination of soft nuts (cashews and pistachios) which only require soaking for 4 hours and drying in a 65°C oven for 8 hours, following this guide here. Michelle is right – activation actually improves and concentrates the flavour of the nuts.

Chocolate and Cardamom Muesli Bars - sliced into pieces

You don’t have to activate your nuts for this recipe, but if the science convinces you it’s worthwhile then you might want to give it a go. It’s a lengthy process – there’s no way to sugar-coat this – however, most of the time the nuts are just soaking in water or drying on an oven tray and if you get into the habit of doing large batches at a time, you can have activated nuts on hand. You could save yourself the labour and buy activated nuts from health food shops but you’ll pay 4-5 times the price of raw nuts. It’s really not that hard to do it yourself and I’m convinced it’s worth it. Enjoy!

Chocolate & Cardamom Muesli Bars

  • Servings: makes 12-20 bars
  • Print
Adapted from Apples Under My Bed

1 & 2/3 cup rolled oats
1 cup cashews (raw or activated)
2/3 cup pistachios (raw or activated)
2 Tbsp sunflower seeds or pumpkin seeds (pepitas)
1/4 tsp sea salt
100g dark chocolate, at least 70% cocoa solids
1/3 cup runny honey
2 Tbsp tahini
1 & 1/4 tsp ground cardamom
1 Tbsp olive oil
2 eggs

Preheat the oven to 180°C/355°F. Line a 15x25cm baking pan or similar sized tin with baking paper.

In a food processor, chop the rolled oats until they are ground to a fine flour, then transfer to a mixing bowl. Add the nuts to the food processor and pulse until roughly ground (a mix of fine and chunkier pieces is ideal). Add the chopped nuts to the bowl along with the sunflower seeds and salt.

Measure the honey, tahini, ground cardamom and olive oil into a small saucepan. Place the pan over a medium heat, and whisk until smooth then pour over the oats and nuts. Lightly beat the eggs in a small bowl, then add them to the oats and nuts. Add the chocolate to the food processor and blitz it until roughly chopped. Add the chocolate to the bowl also.

Stir all ingredients together to combine thoroughly. If the mixture is too dry and crumbly, add 1 Tbsp water to moisten. If it is too wet, add a little extra ground oats (or another flour) to absorb the excess moisture. Press the mixture into the prepared pan, using fingertips moistened with water to firmly pack and smooth the mixture.

Bake for 25 minutes until golden and firm to the touch. Leave to cool in the pan, then slice into bars. Store in an airtight container in the fridge to maintain the freshness of the nuts.

Filed under: Eat