comments 10

Making Home: Objets d’art (Part 2)

Nana's pot planted with Mother-in-law's Tongue and West German vase

There have been a few highs and lows lately, a few changes too. This post has been sitting in draft form for nearly six weeks – I’ve just been either too busy or too distracted to finish it. Don’t get me wrong, busy is exciting, and rollercoasters remind me that I’m alive and still have much to learn, but it’s time for a withdrawal all the same; time to balance out my public self, which is showing signs of frazzle. Maybe I need a sleep in, a yoga class, or just to spend a bit more time writing here, in my creative space. Whatever it is, I am craving a weekend of quiet and slow, at home, doors closed, bowl of pasta and red wine in hand.

One meaning of home is sanctuary, a place of comfort, rest and refuge. It’s an idea that we have sought to create in every place we’ve lived, but especially in this one. The warm and cosy interior of our apartment is like a blanket against the world, especially at night when the dim lighting wraps the darkness closely around. No matter how cold, noisy, and crowded it gets outside, home always feels like an escape (and yes, we should all be so lucky).

Inside our apartment I have numerous small treasures collected over the last four years. I have mostly found these at charity/op shops (thrift stores), but some have been received as gifts, passed on as family heirlooms, or occasionally purchased brand new in moments of why not? Last year I featured many of these objects in a post (see here), and although it’s a bit weird to quote myself, what I wrote then is still what I want to say: “a sense of home is [partly] created by the accumulation of beloved objects…these are “my things” but it’s also true that they are me; repositories for my memories, constellations of family connections, and a partial reflection of who I am or who I want to be.”

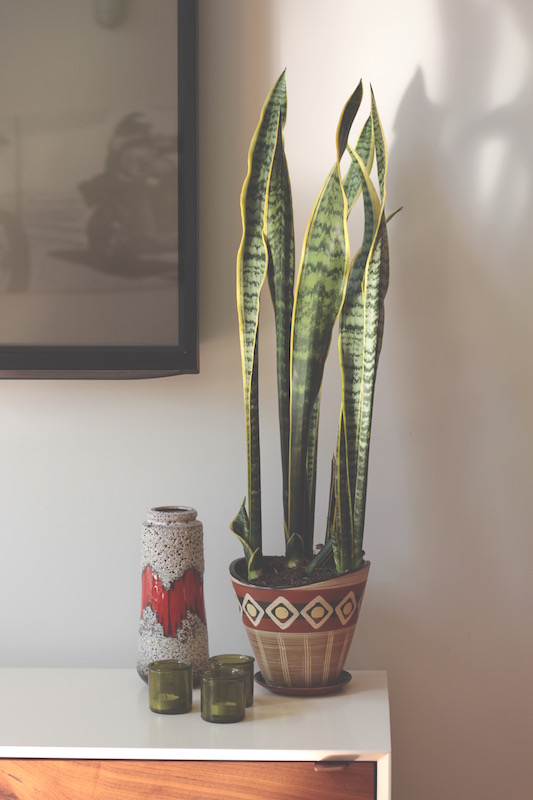
For example, the photo above features a retro plant pot that used to grace Nana’s lounge when she lived in Auckland during the 1960s and 70s. Nana always had an eye for fashion, and Mum remembers that Nana bought the pot as a stylish ornament for her newly renovated lounge. She planted it with Mother-in-Law’s Tongue, therefore so did I (nothing else would do) and it now sits as an authentic mid-century-modern antique in my own lounge. That’s a nice little full circle, right there. The photo also features a West German vase found at a local antique store after a friend said that he could just “see” one sitting there. Now I think of him every time I see it. In some way, these objects are all pieces of me.

I’m wary of rampant accumulation so selecting objects with a story as well as a function has helped me make decisions about what to bring into my home. The following photos present the treasures that I’ve collected over the past 12 months. Bit by bit by bit, my sanctuary is slowly and carefully created by the presence of these things.

Tea cosy by Mum, pom-pom's by Hunter and teapot by P&K

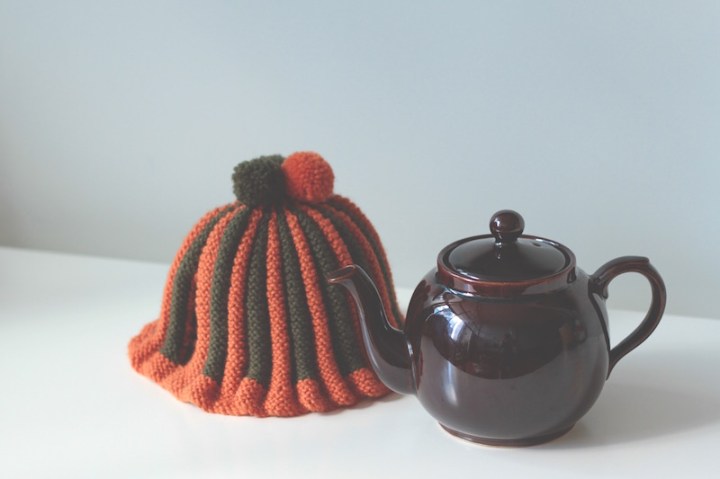
Above: Tea-cosy knitted by Mum in classic 70s colours, topped with pom-pom’s made by my six-year-old niece, Hunter, who is so into knitting right now. The tea-cosy now covers a brown English teapot (by P&K, possibly from the 1950s?), found at a local antique store on one of my weekend ramblings.

Marimekko mug, T2 tin, kumara plant and 70s little dishes

Above: Marimekko mug for my desk at my new job, a bright green T2 tin which holds the most delicious oolong tea (a gift from my work mates at my old job), and a kumara (New Zealand sweet potato) propped up in a jar, on its way to becoming a house plant. I remember growing kumara plants like this as a child, but had forgotten all about them until I spotted a one at an organic cafe a few months ago.

Mum's white and brown enamel casserole dish

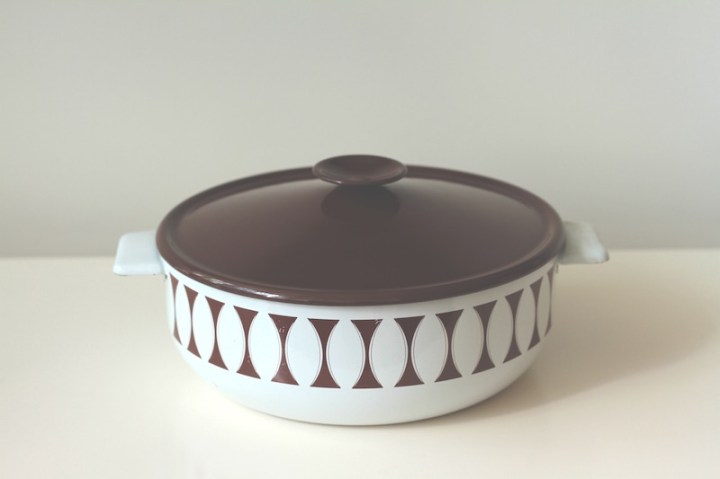
Above: Mum’s white and brown enamel casserole dish – the scene of many an overcooked dinner during the first years of her married life in the early 70s. I think that for Mum, this dish is a bit tainted by these failures, but I’ve promised to try and give it a new lease of life.

New linen tea towels - Kiwiana and Marimekko

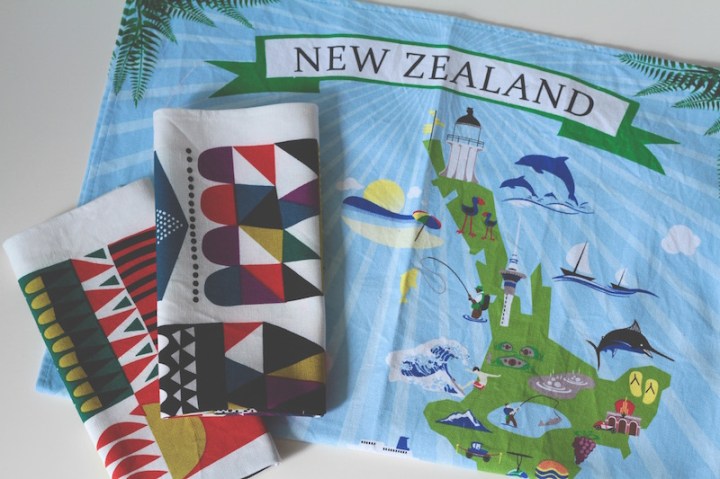
Above: The Marimekko obsession continues with two colourful linen tea towels designed by Sanna Annukka. Also, the most wonderfully kitsch New Zealand tea towel, a gift from sister Kirsty. Normally I insist that all my treasures must be used as they were intended to be…but so far I haven’t been able to use any of these three divine tea towels to actually dry dishes. It’s a dilemma.

Glass bowl and orange milk jug

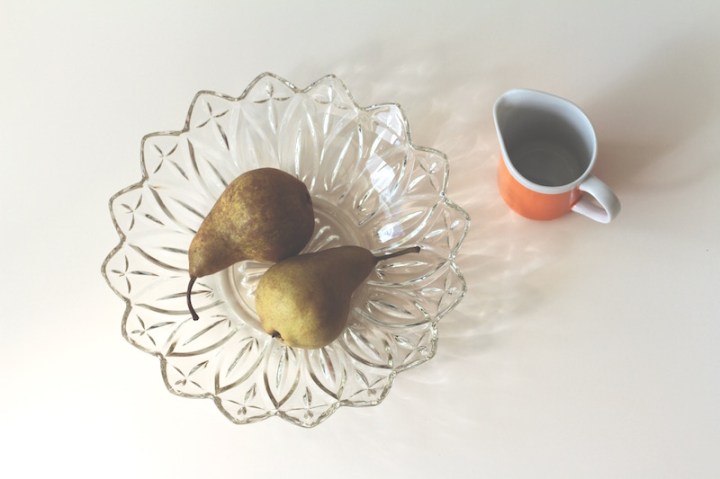
Above: Cut glass bowl with an interesting zig-zag edge, found at a local charity store, and an orange and white milk jug from Lorae’s place, rescued by my brother-in-law, Alan. I love it when people set aside things that I might like.

Retro Jason's Placemats - New Zealand landmarks

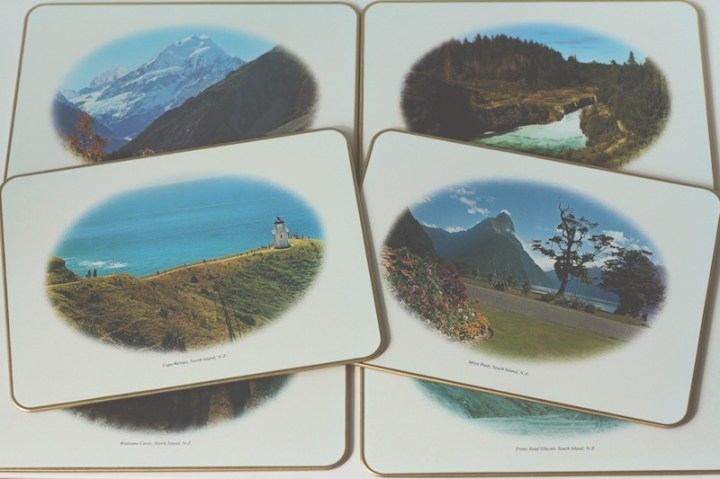
Above: Retro Jason’s placemats! Stashed away for decades by my mother-in-law Lorae, these placemats feature famous New Zealand landmarks like Cape Reinga, Mitre Peak and Mt Cook. The photographs are presented in all seriousness, as vignettes, set off by white space and elegant gold edging. When you open the box, you get that wonderful whiff of “old”.

Green pottery cake stand

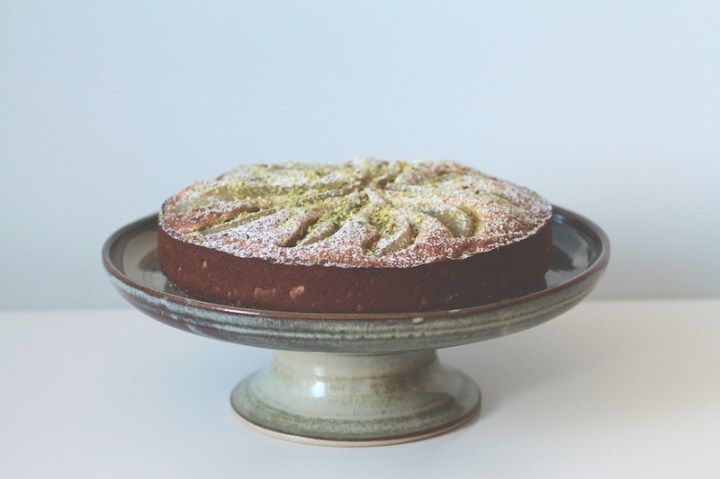
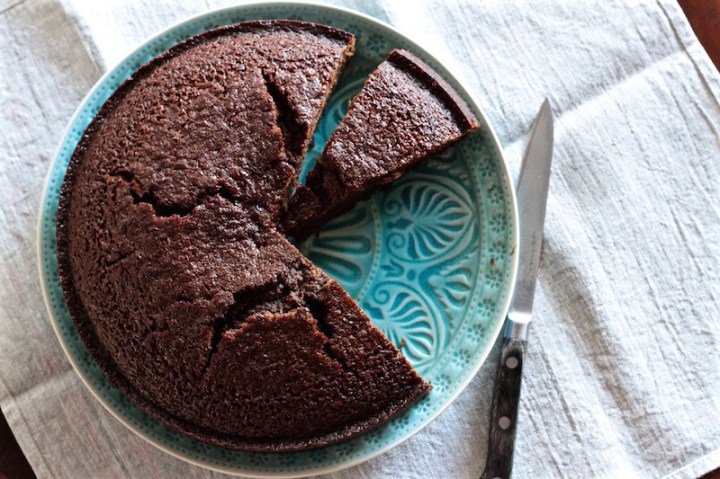
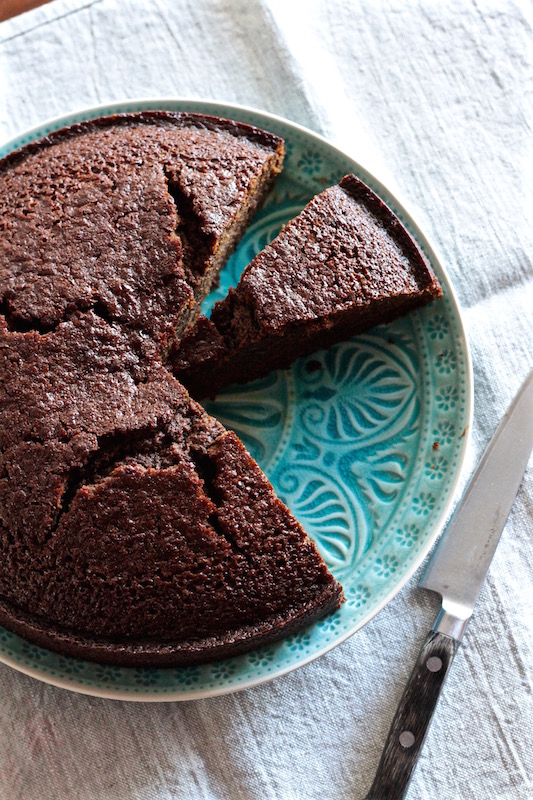
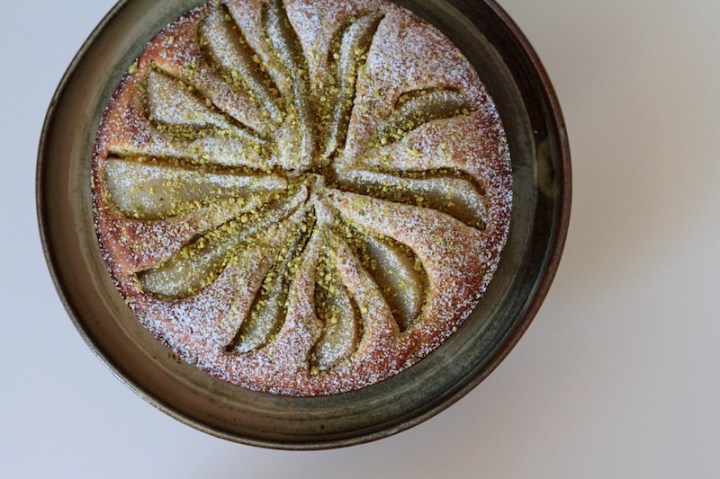
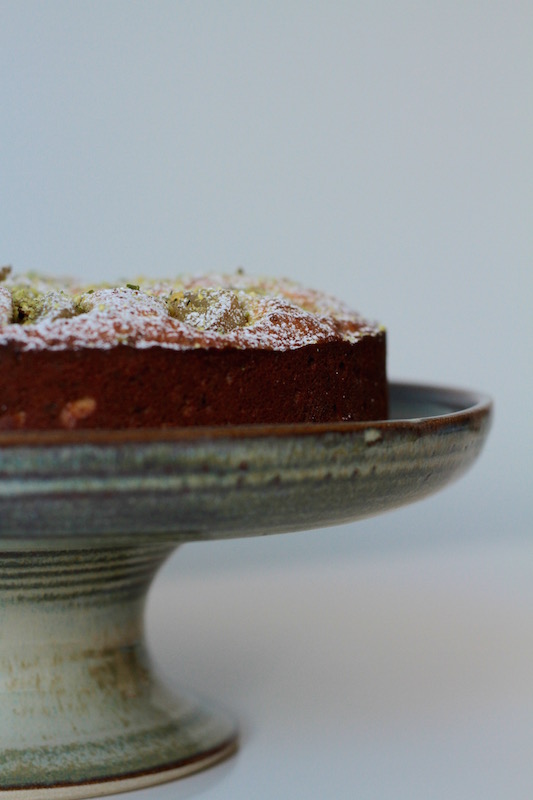
Above: Green pottery cake stand, found at a local charity store. It took me a few minutes of hmmm to decide if it was hideous or special. I decided on the latter, and since buying it, all I ever see are plain white ceramic or glass cake stands. This one is definitely unique! It set off my Pear & Pistachio Cake really well (recipe here).

Vintage coasters

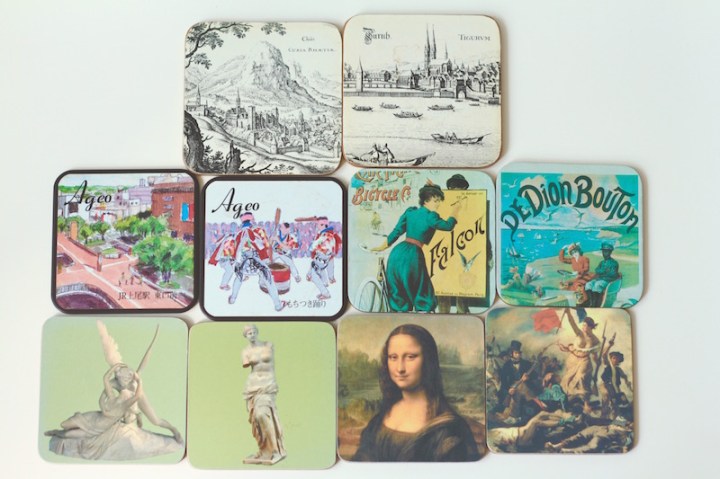
Above: Vintage coaster collection, bought in two’s and three’s from local charity stores. My favourites are the Japanese souvenir coasters featuring scenes from Ageo.

Danish yellow bowl and olive green goblet

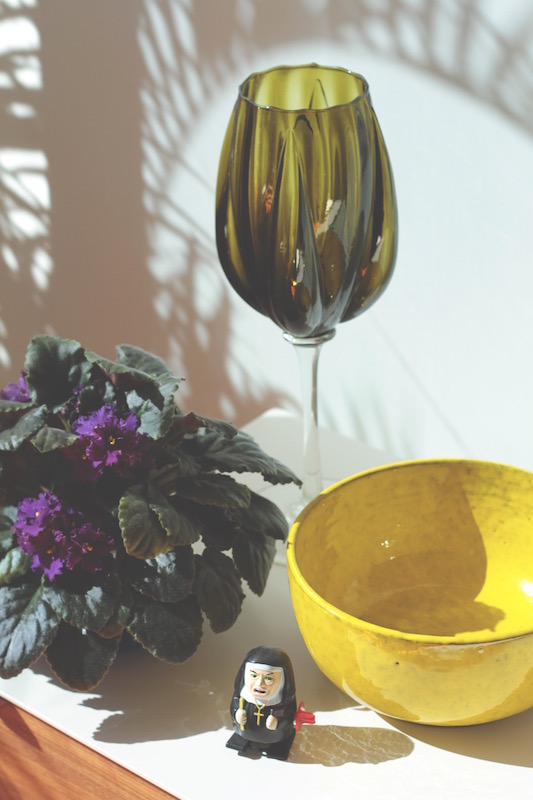
Above: Yellow Danish bowl, sold as an antique, but possibly we were simply dazzled by the bright glaze because I can’t identify the designer. Olive-green glass goblet in a pretty tulip shape, so mid-century, but beyond that, also a mystery. African Violet, rescued from work, and Nunzilla, a Christmas present from years ago, courtesy of Gordon and Anne. Kitschy plastic Nunzilla shoots sparks out of her mouth when she is wound up.

comments 19

The Month of Cake: Fresh Ginger Cake

David Lebovitz's Fresh Ginger Cake

The Month of Cake is a celebration of my wonderful colleagues. Sadly, I’ve had to leave these lovely people to take up a new opportunity. To show my appreciation for all the great times we’ve had, I baked them four cakes – one for each week of my notice period. For more details about why these guys are so awesome, check out my post from Week 1 of The Month of Cake.

The final cake of The Month might not win any prizes in the looks department, but it easily got the most votes for flavour. I have to agree; it is good. It’s a dark, sticky ginger cake, made with a whopping quantity of fresh ginger, balanced out with cinnamon, cloves and black pepper and mellowed with treacle. It smells and tastes like the warmest kitchen on the coldest winter’s day, like roaring fires, mulled wine and the white Christmas I never had. I’m not ashamed to admit that I licked the spatula clean after pouring the batter into the tin.

Grinding spices for fresh ginger cake

This is a David Lebovitz recipe. David’s recipes are always wonderful, so when I was searching for a suitable finale for The Month, it was only natural for me to turn to him. I came across this recipe for Ginger Cake in his book, Ready for Dessert. The cool weather had already planted the seed of gingerbread in my mind, but it was David’s introduction that held my attention:

Of all the desserts I’ve ever made, this cake is the one that is most renowned, drawing acclaim for its incredibly moist texture and its spicy zing from an overload of fresh ginger. Many people have told me this is their all-time favourite dessert. And whenever I make it and take a bite, I’m in agreement: it’s one of my favourites as well (2010: 42).

If this was David’s verdict, then that was good enough for me. As David promised, the flavour did not disappoint, but I did have trouble with the cake doming and splitting quite dramatically. The photo in David’s book shows a perfectly flat cake whereas the middle of mine was easily an inch higher than the sides. After a bit of research I made the cake again, using cake flour and measuring the baking soda very precisely, but the same thing occurred. I don’t think it affected the texture or flavour but for the sake of appearance I would prefer a flatter cake. Next time I’ll try a slightly lower cooking temperature, unless any of you has better advice?

Update 9/9/15: Jen from Larder & Loved produced an almost crack-free cake by using a lower oven temperature and slightly less baking soda – head over to her for directions (thanks Jen!).

David Lebovitz's Fresh Ginger Cake

This divine Fresh Ginger Cake lasted all of ten minutes at morning tea time and brought the Month of Cake to a fitting end. In real life I’ve already finished work and farewelled my colleagues with pizza and drinks. That final week induced a sugar frenzy at work, and in addition to my cake and some brownies I got from I Heart Brownies, other people contributed homemade chocolate eclairs, date scones, peanut butter cookies and bliss balls. It was a great last week (thanks guys – again!) but all that sugar does take a toll. I’m currently enjoying a week at home before starting the new job and, out of desperation, I’ve declared it the abstemious Week of Salad. Water and lemon juice, anyone?

If you missed the other cakes, Week 1 was the bright and festive Orange & Yoghurt Semolina Cake. Week 2 was the gluten-free week, and I baked Chocolate Buckwheat Cake and served it with Cinnamon Labneh. In Week 3 I baked one of my all-time favourite cakes, a tender Pistachio Cake with Vanilla Pears.

Fresh Ginger Cake

David Lebovitz, Ready for Dessert

115g fresh ginger, peeled and thinly sliced
1 cup mild-flavoured molasses (treacle)
1 cup sugar
1 cup vegetable oil
2 1/2 cups plain flour
1 tsp ground cinnamon
1/2 tsp ground cloves
1/2 tsp ground black pepper
1 cup water
2 tsp baking soda
2 large eggs

Preheat the oven to 175°C / 350°F. Butter a 23 cm springform cake tin and line the base with baking paper.

Using a food processor, chop the fresh ginger until very fine. Set aside. Place the flour and dry spices into a medium bowl and whisk together to combine and aerate. In a large bowl, whisk together the sugar, molasses and oil (it won’t combine well at this point, but just pull the ingredients together somewhat).

Heat the water in a small saucepan. When it is close to boiling, add the baking soda and stir to dissolve. Pour the hot water over the molasses mixture and whisk together, along with the chopped fresh ginger. The mixture should now combine smoothly.

Sprinkle the flour 1/4 cup at a time over the molasses mixture, and whisk to combine after each addition. Briefly whisk the eggs together in a small bowl, then add the egg to the batter and whisk thoroughly. The batter will be very runny – resist the temptation to add more flour.

Pour the batter into the prepared cake tine and bake for about 1 hour, or until a toothpick inserted into the centre comes out clean. Let the cake cool completely in the tin then invert onto a serving plate. This cake definitely tastes better on the second day (I promise you that it’s worth the wait).

Filed under: Eat
comments 24

The Month of Cake: Pistachio Cake with Vanilla Pears

The Month of Cake - Pear and Pistachio Cake2

The Month of Cake is a celebration of my wonderful colleagues whom I’m leaving for a new opportunity. To show my appreciation for all the great times we’ve had, I’m baking them four cakes – one for each week of my notice period. For more details about why I’m going to miss them so much, check out my post from Week 1 of the Month of Cake.

Week 3 of The Month of Cake was another Julie Le Clerc recipe, a delectable Pistachio Cake studded with vanilla poached pears. I’ve made this cake before, once for my Mum’s birthday (although that time I overcooked it into a solid, dry disc), once for my sister’s birthday (much better this time), and the last time was a few years ago, for another group of great colleagues. Ever since I sorted out the method (Julie directs you to bake it for 1 hour 15 minutes, which turns out to be far too long), I’ve thought of it as one of my best cake recipes. It’s elegant, but not fussy; easy, but definitely special. I love it so much that I don’t make it very often (guys, do you realise that over the last ten years I’ve only made this cake four times, and the fourth time was for you?).

This cake takes a little forethought but the effort is well paid off. Preparation centres on two tasks. Pears are first poached in sweet water spiced with vanilla and left to cool in the liquid until they have sucked the vanilla deep into their centres. Next, the ground pistachio is prepared. I’ve never seen pistachio meal available to buy, but it’s easy enough to grind the nuts to a fine meal in a food processor. Don’t be too concerned if your home grinding results in an uneven meal; I think the cake is better for a few chewy nuggets of pistachio studding the pillow-soft crumb. Once you have your nuts and pears ready it’s a quick job to whip the other ingredients together, nestle the pears into the batter and slide it into the oven.

Once cooked, the cake will have a light golden sheen, which to my eye looks a little odd. This is easily remedied by a dusting of icing sugar and a scattering of pistachio – the contrast of white against green provides the perfect enhancement. I like to eat it singularly unadorned, although Julie suggests pairing it with yoghurt cut half and half with whipped cream (also good). Either way, if you can bear to wait, the cake will be better on the second day. Enjoy!

The Month of Cake - Pear and Pistachio Cake 4

Pistachio Cake with Vanilla Pears

Julie Le Clerc, Feast@Home

For the vanilla pears:
1 cup sugar
3 cups water
1 vanilla bean, split and seeds removed
3 large, firm pears, peeled, cored and cut into quarters

For the pistachio cake:
125g salted butter, softened
3/4 cup castor sugar
3 eggs
2/3 cup yoghurt
2/3 cup plain flour
2/3 cup self-raising flour
1 cup ground pistachios
To serve: icing sugar and 2 Tbsp ground pistachios

To make the vanilla pears, combine the vanilla seeds and husk with the water and sugar in a medium saucepan. Bring to the boil and stir to dissolve sugar. Add the pears and bring back to the boil. Turn down to a low simmer and poach the pears gently for 10 minutes or until tender when pierced with a skewer. Turn the heat off and allow the pears to cool in the poaching liquid.

To make the cake, first preheat the oven to 160°C / 320°F using the fan-bake setting. Line the base of a 23cm springform cake tin with baking paper and butter the sides.

Whisk the flours and pistachio in a large bowl to combine and aerate. Set aside.

Cream the butter and sugar together until pale. Add the eggs one at a time, beating well between each addition. Stir in the yoghurt using a large spatula, then sprinkle over the flour and pistachio and fold in until just combined.

Transfer the batter to the prepared cake tin then place the pears on top, nudging them gently into the batter (positioning them on their sides allows you to fit them all in). Bake for 45 minutes to one hour, or until a skewer inserted into the centre of the cake comes out clean.

Allow the cake to cool in the tin for 10 minutes, then transfer to a serving dish. Dust with icing sugar and sprinkle over the reserved ground pistachio.

Filed under: Eat
comments 5

The Month of Cake: Chocolate Buckwheat Cake

Gluten free chocolate cake - with almond and buckwheat flour

I have great colleagues but I’m about to leave them for a new opportunity. I’m going to miss them, so to show my appreciation I’m baking them four cakes – one for each week of my notice period. For more details about why they are so awesome, check out my post from week 1 of The Month of Cake.

Gluten free chocolate cake made with almond and buckwheat flour

Week 2 of The Month of Cake was Chocolate Buckwheat Cake served with a (slightly controversial) cinnamon-scented labneh. One of my colleagues needs to eat a gluten-free diet, so it was only right that one of the four cakes was a gluten-free version that she could eat. She has also recently discovered that she is not allergic to chocolate, so when I came across this recipe from Deb at Smitten Kitchen, it seemed like the perfect way to help her make up for years of lost chocolate. This cake is built on a dense, fudgy base of well-beaten eggs, butter, sugar and dark chocolate, with a small amount of almond and buckwheat flours added for structure and nuttiness. The only change I made to the recipe was to substitute a little of the white sugar for brown in order to introduce a note of caramel.

Strained yoghurt spiced with cinnamon and honey

Despite its excellent flavour and soft crumb, this cake is quite plain in appearance. A dusting of icing sugar livened it up, but it was still a flat, brown disc that couldn’t compare to the vibrancy of the Orange & Yoghurt Cake that I had made the previous week. It needed an accompaniment and since I had some homemade labneh in the fridge (see here for instructions on how to make labneh) I decided to work with that. Chocolate and cinnamon go well together so I simply mixed 1 cup soft labneh (i.e. 6 hour straining time) with 1/2 tsp cinnamon and 2 tsp runny honey. A large dollop of this mixture complemented the cake well, adding moisture and further complexity to the flavours. It wasn’t universally loved, however, and a couple of my colleagues with fairly unsophisticated palates (ha!) expressed a preference for whipped cream instead. Whatever floats your boat, labneh, yoghurt, cream or plain, this is a cake that I’ll definitely be making again. Next week, Pear & Pistachio Cake!

Gluten free chocolate cake

Chocolate Buckwheat Cake

Adapted from Smitten Kitchen

100g unsalted butter
100g dark chocolate (70% cocoa solids)
4 large eggs
75g castor sugar
25g soft brown sugar
A good pinch of salt
1 tsp vanilla extract
35g buckwheat flour
30g almond meal
To serve: icing sugar, cinnamon labneh or lightly whipped cream

Preheat your oven to180°C / 350°F. Butter a 20cm cake pan and line the bottom with baking paper.

Melt the butter and chocolate together in a bowl resting on a pot of lightly simmering water or in short bursts in the microwave, stirring frequently. Set aside to cool. In a small bowl, whisk the buckwheat flour and almond meal together to combine and aerate. Set aside.

Beat the eggs and sugars with the salt until the mixture is pale in colour and doubled in volume, about 10 minutes. Using a spatula, gently fold in the vanilla and melted chocolate mixture. Sprinkle the buckwheat and almond flours over the batter and fold in gently until just combined. Pour into the buttered tin and bake for 25 minutes or until a skewer inserted into the centre of the cake comes out clean.

Let the cake cool for five minutes then invert onto a rack, remove the paper, and invert again onto a serving plate. Sprinkle with a little icing sugar and serve with cinnamon labneh or lightly whipped cream.

Filed under: Eat